

A few years ago I decided to paint a vintage dresser that we received from my mother in law, white. I wanted to use the dresser in our master bedroom, so painting it white was a way to make it work in the space (and I was totally on board the "paint everything white" train at the time! ha!).
After our master bedroom makeover, I decided to move it to the main floor hallway for storage. The dresser looked great white (I am still trying to find a good picture of it!), but you can see a bit of it in this photo:

Though the white was good, I wanted the piece to stand out a bit more, but not too much. I decided it was time to sand it down and try to restore it to it's original glory. After sanding off the white paint (one of my least favourite jobs) using 60 grit sandpaper (be careful, this is coarse sandpaper so you don't want to apply too much pressure or it could ruin the wood), I chose to stain it with a medium stain. It didn't look good at all! I brought the dresser inside just to confirm that it wouldn't work and alas, my gut was right.
So then it was on to plan B, which I didn't really have at the time. That being said, I'm currently craving warmth and brighter colours in our house, so the idea of bringing a bit of Provence came time mind after being inspired by photos of Julia Engel's trip to France.
The problem was that for the first time in I don't know how long, perhaps ever, I really didn't want to paint the piece. After a little brainstorming, I decided to attempt a whitewash for the very first time and the end result is absolutely wonderful!
For the whitewash I first applied a natural stain to the wood. After that dried I mixed water with Iqualuit Road from Canadian Tire's Premier Paint line. I had picked up a sample of this colour when I was testing colours for the family room makeover, it was a great way to use up the rest of the sample.
I brushed on the mixture (which was more water than paint, at least a 3:1 or maybe even 4:1 ratio for the look I was going for) with a paint brush and then quickly wiped it off with a cloth before it dried too much, which would make it more difficult to wipe off.
I would repeat these steps until I got the right look.
TIP: If you find that you aren't getting enough white, add more paint to the mixture, if it's the opposite, if it's too much white, add more water to your mixture. You can always sand down parts that are a touch too white, which is exactly what happened to me in the beginning. I recommend that you start on the back or side, an inconspicuous area to test your mixture out.
I really wanted to be able to still see the grain of the wood, which is why I used more water than paint in my mixture. If you want the opposite, to cover the grain and see less wood, switch the ratio around.


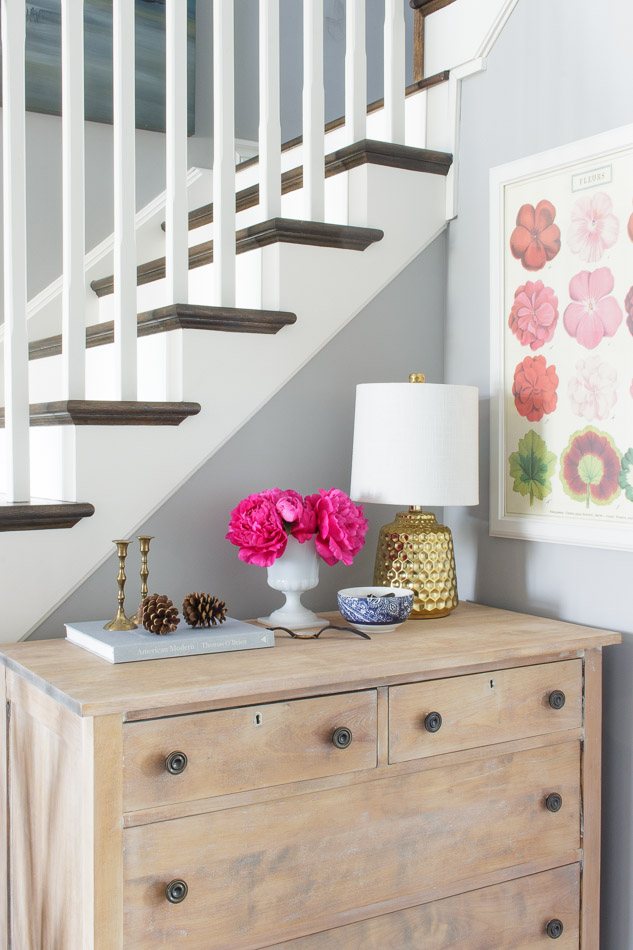


Something else I'm pretty excited about: peony season! Our peony bushes are all in bloom right now and I'm loving it! We planted a few more last year, which means that I'm able to clip some flowers to bring in the house without leaving the gardens completely bare! The colour of the ones in these photos is just unreal!

You may have noticed a new poster hanging above the dresser. I've had my eye on this poster for months and finally purchased it a few weeks ago. You can find it here!

This was my first time ever whitewashing a piece of furniture and I have to say that I love the look! I really like how you can see the grain in the wood and how the detail stands out more and how it has character and a worn look. Some of the white paint still shows, that's another detail that I'm fond of.
It's great how you can totally customize each piece when applying a whitewash simply by selecting the right white or grey paint and adding as much or as little water as needed. There are quite a few methods out there, but this is the one that worked for me!
Cheers,


No comments:
Post a Comment
Thank you so much for taking the time to leave a little note!